LG Washer Won’t Stop Filling With Water? Here’s Why — And How to Fix It

LG washer won't stop filling with water

By Steel City Appliance Repair

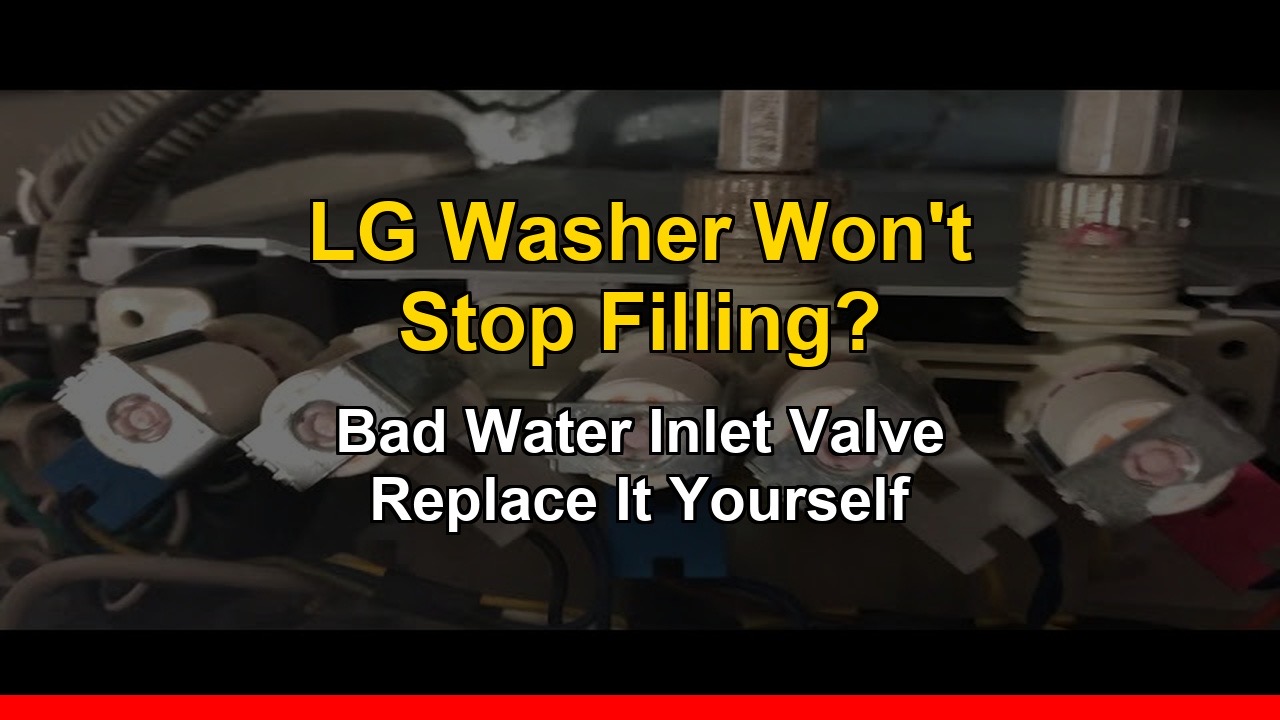
If your LG top load washing machine is overflowing or keeps filling with water even after you’ve unplugged it, the cause is almost always one failed part: the water inlet valve. Replacing it yourself is straightforward and inexpensive.

Why Your LG Washer Won’t Stop Filling With Water

The water inlet valve is an electrically controlled valve that opens to allow water into the washing machine and closes when the correct water level is reached. When the valve fails — usually due to a worn internal diaphragm or debris buildup — it can get stuck in the open position and water flows freely regardless of what the control board tells it to do.

The Key Clue: Water Flows Even When Unplugged

If water continues flowing into the washer even after you unplug it from the wall, the valve has mechanically failed. Since the valve is electrically controlled, unplugging the machine should stop all water flow immediately. If it doesn’t, the valve is stuck open and must be replaced.

What to Do Immediately If Your Washer Is Overflowing

  1. Turn off the water supply valves behind the washing machine — turn both hot and cold valves clockwise until they stop
  2. Unplug the washing machine from the wall
  3. Mop up standing water immediately to prevent floor damage and mold

What You’ll Need

As an Amazon Associate I earn from qualifying purchases. This helps support the channel and keeps these tutorials free.

How to Replace the LG Top Load Washer Water Inlet Valve

Step 1: Unplug and Disconnect Water Supply

Make sure the machine is unplugged and both water supply valves are fully closed. Disconnect the hot and cold water hoses from the back of the machine.

Step 2: Access the Water Inlet Valve

On most LG top load washers the water inlet valve is located at the back of the machine near the top. You may need to remove the back panel to access it fully.

Step 3: Disconnect and Remove

Take a photo of the wire harness connectors before disconnecting. Press the tab on each connector and pull firmly to disconnect. Unscrew the mounting screws and remove the internal hoses using pliers to release the clamps.

Step 4: Install the New Valve and Test

Connect the internal hoses to the new valve and secure the clamps. Mount the new valve and reconnect the wire harness connectors. Reattach the external water supply hoses, turn the supply valves back on slowly, plug the machine back in and run a short wash cycle.

Watch the Full Repair Video

👉 LG Top Load Washer Won’t Stop Filling — Watch the Full Fix

Cost Breakdown

ItemCost
Replacement water inlet valve~$20–$40
Professional repair call-out$150–$250
Your savings$110–$230

Still Having Issues?

Drop your model number in the comments and describe what’s happening — I’ll help you diagnose the next step. Subscribe to Steel City Appliance Repair for weekly DIY appliance repair tutorials.

Whirlpool Refrigerator Not Cooling But Freezer Is Fine? Check the Back Wall for Ice

Whirlpool refrigerator not cooling, but freezer is fine.

By Steel City Appliance Repair

If your Whirlpool refrigerator isn’t cooling well but the freezer still seems okay — and especially if you’re seeing water leaking out of the ice dispenser into the fridge — open your freezer and look at the back wall. If it’s covered in a thick layer of ice, you have a defrost problem, and this guide will walk you through exactly how to diagnose and fix it.

This repair covers the Whirlpool French Door refrigerator (model WRX735SDHZ00) but applies to many other Whirlpool French Door models with the same symptoms.

What’s Actually Happening — The Full Diagnosis

Here’s the chain of events: the defrost bi-metal fails and tests open when it should be closed. Without a working bi-metal, the defrost heater can’t activate. The evaporator coils freeze over completely. With the evaporator frozen solid, the evaporator fan can’t circulate cold air into the refrigerator compartment. The fridge warms up while the freezer stays cold. The ice in the ice bin starts to melt and leaks out through the front of the ice dispenser.

Every one of those symptoms traces back to one small failed part: the defrost bi-metal.

Understanding the Defrost Bi-Metal

The defrost bi-metal is a temperature-sensitive switch that controls the defrost heater. When it fails in the open position, the defrost heater never activates and the evaporator freezes over.

Important: On this Whirlpool model, the defrost bi-metal is bundled with the evaporator fan motor. You can’t buy the bi-metal by itself — you need to order the fan motor assembly, which includes the bi-metal.

What You’ll Need

  • Whirlpool evaporator fan motor (includes defrost bi-metal): order on Amazon here (affiliate link)
  • Digital multimeter: Amazon link (affiliate link)
  • Replacement water filter: Amazon link (affiliate link)
  • Steamer (to safely defrost the frozen evaporator coils): Amazon link (affiliate link)

As an Amazon Associate I earn from qualifying purchases. This helps support the channel and keeps these tutorials free.

Step 1: Run Diagnostics Mode

Run the fridge through its built-in diagnostics mode to confirm the bi-metal is the problem. If the bi-metal tests open while the evaporator is clearly frozen, it has failed and needs to be replaced.

Step 2: Remove the Freezer Drawer

Pull the drawer out to the fully open position, lift the front slightly and pull forward to disengage the slides, then lift the entire drawer assembly out. Watch the video below for the exact technique.

Step 3: Defrost the Frozen Evaporator Coils

Use a steamer to carefully melt the ice — this is faster and safer than a hair dryer and won’t risk damaging plastic components. Have towels on hand to absorb the meltwater. Don’t use anything sharp to chip the ice — you can easily puncture a refrigerant line. This step takes 15–20 minutes.

Step 4: Replace the Bi-Metal and Fan Motor

Remove the freezer back panel screws and pull it forward to expose the evaporator coils and fan motor. Disconnect the bi-metal and test it with your multimeter on continuity setting — it should show continuity when cold. If not, it has failed. Remove the old fan motor assembly and install the new one. Reinstall the freezer back panel and drawer, restore power, and give the fridge 4–6 hours to return to normal temperature.

Watch the Full Repair Video

👉 Whirlpool Refrigerator Not Cooling + Leaking Water — Full Fix

Cost Breakdown

ItemCost
Evaporator fan motor + bi-metal assembly~$40–$60
Professional repair call-out$200–$350
Your savings$140–$310

FAQ

Can I just defrost the evaporator without replacing the bi-metal? You can, but the evaporator will freeze over again within a few weeks because the root cause hasn’t been fixed. Always replace the bi-metal when you defrost.

How often should the defrost cycle run on a Whirlpool refrigerator? Most Whirlpool refrigerators run a defrost cycle every 8–12 hours. If the bi-metal is working correctly you should never see ice buildup on the evaporator.

Still Having Issues?

Drop your Whirlpool model number in the comments on the video — I respond to every comment as quickly as possible. Subscribe to Steel City Appliance Repair for weekly DIY appliance repair tutorials.

LG Dryer Has No Heat? Here’s the Real Reason the Heating Element Fails

LG dryer not heating

By Steel City Appliance Repair

If your LG dryer is running but producing no heat, the heating element is almost always the cause. But here’s what most repair guides don’t tell you: there’s a specific reason LG dryer heating elements fail that, if you don’t understand it, means the problem will come back after you replace the part.

The Real Reason LG Dryer Heating Elements Fail

On LG dryers there’s a specific failure pattern: the element sags. Over time, the heating coil can droop and make contact with the metal dryer case. When this happens the element becomes grounded — it stays energized even when it should be off. The dryer runs hotter than it should, and eventually the high limit thermal fuse blows to protect the dryer.

Once the high limit fuse blows, the dryer loses heat entirely. This is why it’s important to replace both the heating element and check the thermal fuse at the same time.

Symptoms of a Failed LG Dryer Heating Element

  • Dryer runs normally but clothes come out cold or damp
  • Dryer takes multiple cycles to dry a normal load
  • Dryer drum spins but no warm air is felt at the exhaust vent
  • Dryer trips the thermal fuse repeatedly after replacement

What You’ll Need

  • LG Dryer Heating Element 5301EL1001A — order on Amazon here (affiliate link)
  • Multimeter (to test the element and fuse before replacing)
  • Phillips head screwdriver and nut driver set
  • 30–45 minutes

As an Amazon Associate I earn from qualifying purchases. This helps support the channel and keeps these tutorials free.

Step 1: Test the Heating Element

Unplug the dryer first. Safety is critical — dryers run on 240V. Disassemble the dryer to access the heating element housing. Set your multimeter to continuity. Touch the probes to both terminals on the heating element. A good element shows continuity; a failed element shows no continuity (OL or open circuit). If failed, also visually inspect for the sagging coil touching the housing.

Step 2: Check the High Limit Thermal Fuse

The thermal fuse is mounted on or near the heating element housing. Test it with your multimeter — it should show continuity. If not, it has blown and must be replaced along with the element. It’s typically a $5–$10 part.

Step 3: Install the New Heating Element

Install the new element (5301EL1001A) making sure the coil sits correctly and is not touching the housing walls. This is the critical step — a properly seated element won’t sag and ground out again. Reconnect all wires, reassemble the panels, and run a test cycle to confirm heat is restored.

Watch the Full Repair Video

👉 LG Dryer Not Heating — Full Heating Element Replacement

Cost Breakdown

ItemCost
LG Heating Element 5301EL1001A~$20–$35
High limit thermal fuse (if needed)~$5–$10
Professional repair call-out$150–$250
Your savings$105–$225

FAQ

Do I need to replace the thermal fuse every time I replace the heating element? Not necessarily — test it first. But if the element failed due to the sagging/grounding issue, the fuse has almost certainly blown too.

My LG dryer has heat but takes forever to dry — is it the heating element? Not necessarily. Slow drying is more often caused by a clogged lint filter or blocked exhaust vent. Check those first.

Still Having Issues?

Drop your LG dryer model number in the comments below. Subscribe to Steel City Appliance Repair for weekly DIY appliance repair tutorials.

Samsung Top Load Washer Won’t Drain? Check the Pump for a Clog Before Replacing Anything

Samsung/LG top-load washer won't drain.

By Steel City Appliance Repair

A Samsung top load washing machine that won’t drain is one of the most frustrating appliance problems — you open the lid to find clothes sitting in a tub full of water. Before you order a new drain pump or call a repairman, there’s an important first step: check the pump for a clog.

In a large percentage of cases, a sock, coin, hair tie, or small piece of debris lodged in the drain pump is the entire problem — and clearing it takes less than 15 minutes.

Two Reasons a Samsung Top Load Washer Won’t Drain

1. Something is stuck in the drain pump. Small items that escape the drum can get lodged in the pump impeller and prevent it from spinning. The pump motor may still be running fine, but the blockage stops water from moving through.

2. The drain pump itself has failed. If the pump is clear and the washer still won’t drain, the pump motor has likely burned out or seized and needs to be replaced.

What You’ll Need

As an Amazon Associate I earn from qualifying purchases. This helps support the channel and keeps these tutorials free.

Step-by-Step Fix

Step 1: Drain the Standing Water First

Use a wet/dry vac to remove as much water as possible from the drum before accessing the pump. Have towels on hand — some water will spill.

Step 2: Access the Drain Pump

Unplug the washing machine. On Samsung top load washers the drain pump is typically at the bottom of the machine. Tip the washer forward or lay it on its back to access it — have someone help with this step.

Step 3: Check for a Clog

Use hose clamp pliers to slide the spring clamps back on the hoses, then pull the hoses off the pump. Shine a flashlight into the pump inlet and look for any debris. Check that the impeller spins freely by hand. If it spins freely with no visible debris, the pump is likely good.

If the impeller is seized, won’t spin, or the pump housing is cracked, the pump needs to be replaced.

Step 4: Reassemble and Test

Reattach both hoses, stand the washer back upright, plug it in, and run a drain/spin cycle. If the washer drains completely — you’re done. Total cost: $0.

Watch the Full Repair Video

👉 Samsung Top Load Washer Not Draining — Full DIY Fix

Cost Breakdown

ScenarioPart Costvs. Repair Call
Clog cleared — no parts needed$0Save $150–$250
Drain pump replacement needed~$25–$50Save $100–$200

FAQ

My Samsung washer won’t spin either — is it related? Yes. On Samsung top load washers, a drain failure often prevents the spin cycle from completing. Fix the drain issue first and the spinning problem will likely resolve itself.

How do I know if the pump motor is burned out vs. just clogged? If the impeller spins freely by hand and there’s no debris, but you heard the pump humming during the cycle, the pump is likely burned out.

Still Having Issues?

Drop your Samsung model number in the comments below and describe what you’re seeing. Subscribe to Steel City Appliance Repair for weekly DIY appliance repair tutorials.